Cameras
One of the basic fundamentals for a Video Management Software application is the ability to configure and manage cameras as video data input devices. Cameras are configured in Perspective VMS within the Administration Module and a user must have adequate permissions for their user login to view, configure or delete cameras.
Cameras may be added manually one at a time, copied from pre-existing cameras for rapid staging or by using the Camera Discovery feature (see below). When adding a new Camera (either via Add Camera or Copy Camera and then Edit Camera), an administrator may define or adjust several settings and information fields for that camera.
Set Camera Basic Information
The initial tab for configuring a camera allows a user/administrator to identify the camera's name and model information. There are several required fields on each tab denoted by a red asterisk *.
_536x551.png)
The Camera Model can be chosen from a select list of all of the default and custom camera models within the system. If a new custom model is necessary one can be added in the Camera Models section of Administration. While the Camera Name is required to identify the camera, the camera description is an optional field. Other fields are defined here below:
- Time zone: Field indicates the timezone of the camera (not the server or client).
- Map Item Icon: Pick-list of existing default or custom icons. Custom icons may be added in the Icons section of Administration.
- Region: The region field indicates what resolution will be used by the camera depending on the power frequency relative to global location. For North American customers the standard choice is NTSC, while Europe and Asia would select PAL.
- Default Aspect Ratio: These selection defaults the selected aspect ratio if the camera is selected to appear from another module or search result. Within camera or archiving viewing the ratio may always be changed to suit the customer's preference regardless of this default setting.
- Camera Collection: This pick-list references the defined Camera Collections configured within Administration. This is suitable for grouping cameras together in filter lists.
- Stream Settings (Read and Quality): These four fields are dependent upon the Camera Model chosen above. If the Model itself supports multiple codecs, then the user would be able to select from the codecs supported for reading from the camera. Similarly, if the model supports a quality setting on a video codec, then the field would be populated by the values supported.
- Stream Settings (FPS): FPS stands for Frames per Second and indicates how many Frames are required when streaming the camera live. *Note there is a separate setting for "Archive FPS". Only cameras that support dynamic FPS through Perspective are able to have this field set, otherwise the setting will be dependent on the device's own configuration installed.
- Active: This is an important field in order to see or archive a camera. If deselected this camera may be configured but will NOT be operational. This is used commonly by administrators pre-staging cameras before they are installed. Once the camera is ready the Active checkbox should be selected to start the camera's operations in Perspective VMS.
- Monitored: Camera status may be monitored for service failures. By selecting this option, the Health Service will incorporate this camera into its monitoring routines. If there is a desire or need to exclude the camera from monitoring a user/administrator may select this option. *Note that all unmonitored but active cameras will report as such on the Daily Health Service - Server Report email.
Camera Nomenclature (Practices)
Since the Camera name is a reference object for search, sort, and filter lists it is recommended to have a systematic nomenclature or naming pattern for easy recognition by users. A popular naming convention consists of a Site Abbreviation, Floor or Exterior annotation, and Camera number, followed by a descriptor. Examples of such names are:
- "LHQ.7F.03 - Conference Room" - This indicates a camera within the LENSEC Headquarters site, located on the 7th floor, pointing at the conference room.
- "PGH.1F.15 - Development Office PTZ" - This indicates a Pan-Tilt-Zoom camera within the Pittsburgh site, located on the 1st floor in the Development Office.
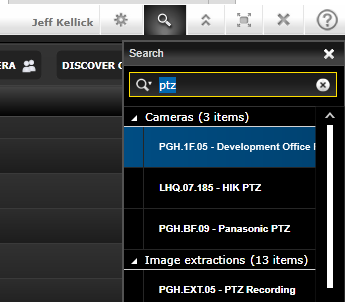
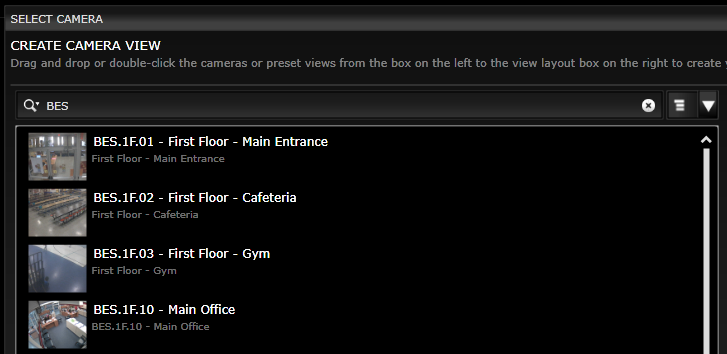
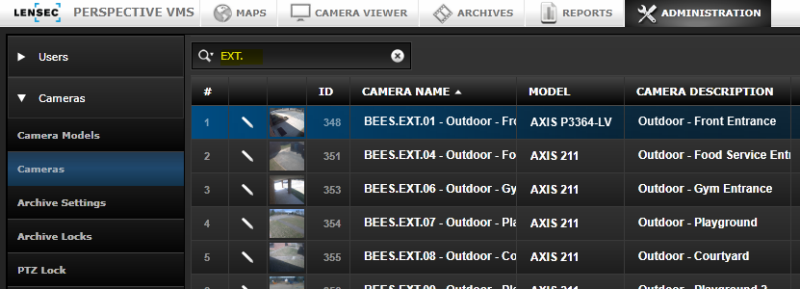
The preceding image shows an example of using Global Search to quickly find all "PTZ" cameras if they are named under the convention noted above. Other examples below show how by using the Select / Switch Camera Component a user can find all cameras from the "BES" site as well searching for cameras on a certain floor or if using "EXT" to designate exterior from Camera Administration itself.
The numerical value appended within the camera name can reference different values for different users. An installer may choose to use the Perspective issued Camera ID, but most installations have a defined camera number that is associated to the physical installation location assigned during the design or architecture of the facility. By using this number as a search item within the name, this can be another efficient means of locating a specific camera in search or filters.
All of these examples illustrate how a thoughtful naming practice can greatly benefit both users and support technicians in identifying cameras quickly.
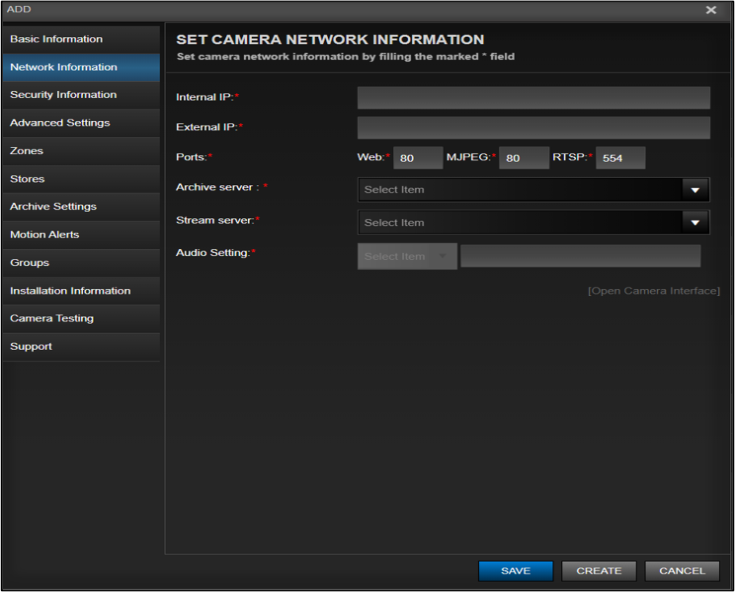
Set Camera Network Information
To communicate to a Network Camera device the address parameters of the device must be set. Perspective VMS allows for both an Internal (local) IP address and an External (public) address if applicable. If only one address applies it may be entered for both fields. By default, the basic port is set for "80" but this value may be changed if necessary for communication to the camera. IPv4, IPv6, and DNS Hostname addresses are allowed valid forms of device network identification.
Identification of the servers (services) necessary for support this camera are also located on this tab. The Server lists will be populated from the Servers section of Administration.
Finally, if audio is applicable for this camera the user may choose the audio source (Camera or External). If selecting "External" the IP address and parameters may be entered into the adjacent field.
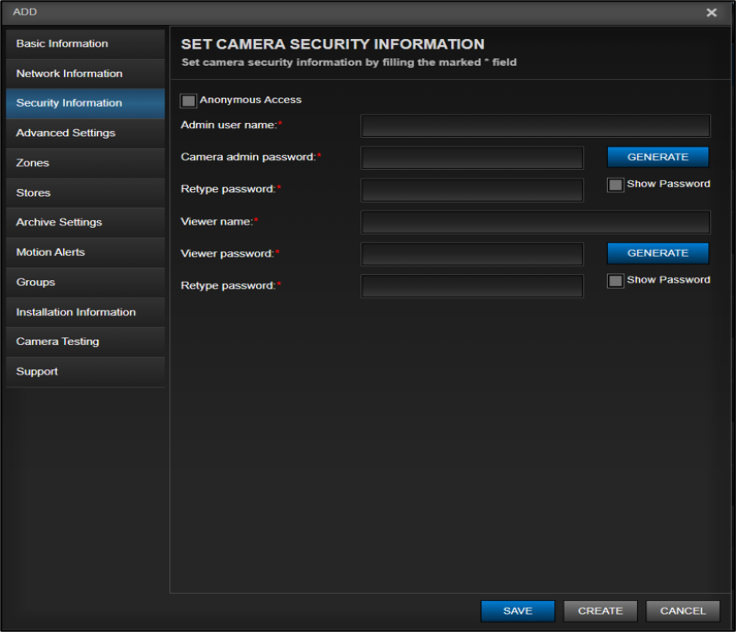
Set Camera Security Information
Cameras typically have security parameters involved. This tab allows users/administrators to configure the security parameters of the camera/device.
Users may duplicate the Admin and Viewer account information if only one credential is known. The "Show Password" option is a permissionable feature and is only displayed to user groups where this permission is granted explicitly.
Set Advanced Camera Settings
Dependent upon the camera model, a camera may have the ability to enable advanced features. There may also be select Custom Attributes enabled for a selected camera. If a camera model or configuration does not support an advanced attribute it will be grayed-out and disabled for selection.
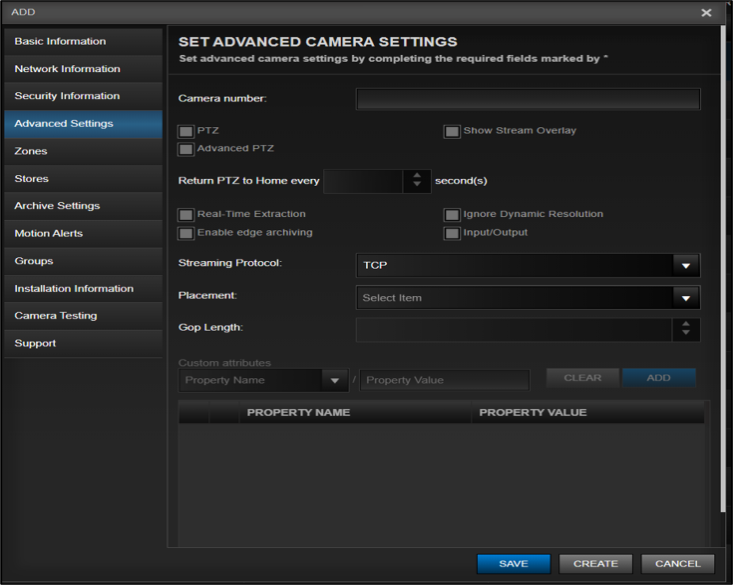
Specific fields are defined here below:
- PTZ/Advanced PTZ: If a model is a Pan-Tilt-Zoom (PTZ) camera than those functions can be enabled here. To enable advanced PTZ functions such as the Camera Viewer Container, PTZ Sphere and Camera Viewer Container, Camera Overlay Advanced PTZ options the "Advanced PTZ" must be selected although it may not operate fully on all models. If only the PTZ value is selected, then only the Camera Viewer Container, Basic PTZ control will be available for the users.
- Real-Time Extraction: This field allows select models the ability to record on-demand regardless of the current archiving state. If enabled it will be visible on the Camera Viewer Container, Camera Overlay Main.
- Edge Archiving: Another model specific feature that if enabled will pull archives from the cameras own storage card/drive on the "edge" if the connection to the archiving server is disrupted. These settings for edge-archiving must also be carried out on the camera itself and storage must be added to the device.
- Camera Motion Detection: This is a feature on selected models that allow motion to be determined at the edge and only send video upon the affirmation of this motion. This can save bandwidth and overhead when compared to server-side motion detection which is the default condition for Perspective VMS. The downside is that camera-side motion detection may not be as consistent or reliable as server-side motion detection.
- Ignore Dynamic Resolution: Dynamic resolution allows for cameras with multiple resolution attributes to stream at a size appropriate for larger and smaller container sizes, making streaming more efficient overall. Dynamic resolution preserves bandwidth if viewing many cameras at once. By ignoring this feature, all cameras will stream in their native highest resolution.
- Input/Output: Selected camera models have wired inputs and outputs that Perspective VMS can communicate with to send or receive messages as part of a workflow. To enable the camera input for the workflow this option must be selected.
- Show Stream and Archive Overlay:
- Direct Connection: Limited manufacturers (Axis and Vicon/IQinVIsion) allow Perspective VMS to pull streams directly from the camera to the client Camera Viewer bypassing the Streaming Service proxy. This feature if selected can lessen the burden on the streaming service. Only cameras with a Cross-Domain Profile (security) file will correctly stream.
- Camera Number: For cameras or encoder devices with multiple sensors or virtual Fields Of View (FOV), the camera number field allows a user/administrator the ability to determine the channel or number for this individual camera view. This field will only be visible if the camera model selected is multi-channel/multi-sensor enabled.
Custom Attributes are fields that may be selected for models with a correct corresponding value.
- Connection Timeout (ms): Timeout in milliseconds for a camera connection in streaming service. This attributes overrides the Global Setting (CameraTimeoutInSeconds) within System Settings. The Value can be set as any integer.
- Disable Basic Authentication: This disables the basic authentication when communicating to a camera letting the camera decide the nature of authentication. The Value can be set as TRUE
- Live ONVIF Profile: This is a testing function that allows for setting a profile name when streaming using ONVIF. The Value would be set to the specific testing "string"
- Use Archiving Service: If limited to one singular stream from the camera, this will connect to the archiving service to obtain the stream instead of the camera streaming service. The Value can be set as TRUE
- Camera Position: A setting for Immervision camera lenses specifically to determine the mounting position of the physical camera lens. The Values are: "0" which means Wall, "1" which means Ceiling, and "2" which means Floor.
- Lens String: A setting for Immervision camera lenses specifically to determine the lens type. The Values are "A0**V", "A8TRT", "A1UST"
- View Type: A setting for Immervision camera lenses specifically to determine the stream view: The Values are "0" which means 360 degree, "1" which means Quad View, and "2" which means Panoramic View.
Set Camera Archive Settings
To enable a camera to archive (record) video data within Perspective VMS the Archive Settings must be configured. This control has two sections, one for setting the archiving type and conditions and the other for setting the storage parameters. When adding or updating the archive type (top) the user must click Add (or Update) before saving.
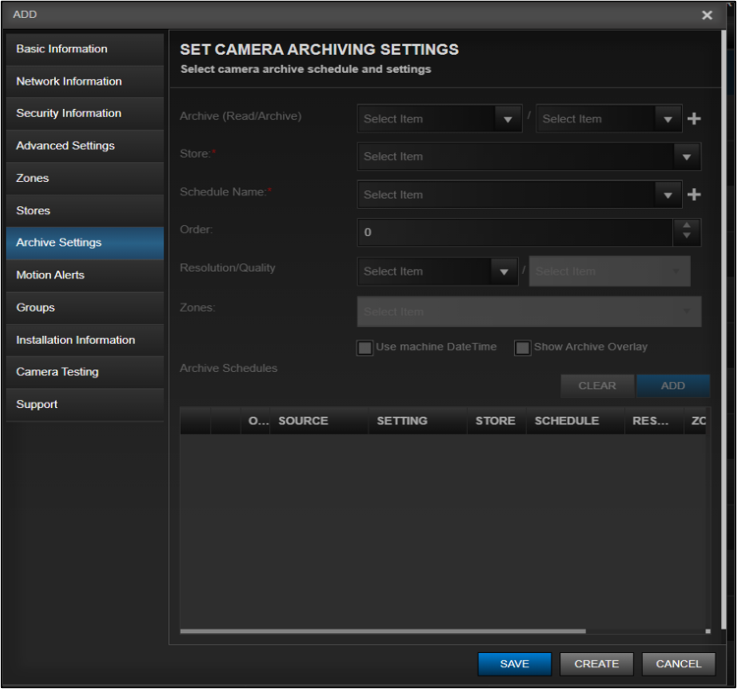
The fields within the Archive Settings are as follows:
- Archive (Read/Archive): The first setting "Read" establishes which codec Perspective VMS will use to read from the camera. The choices available will be predicated upon the Camera Model selected in Basic Information. The second option "Archive" will set the encoding, Frames Per Second (FPS) and motion parameters as defined by a pre-defined pick-list of Archive Settings. If the desired configure does not already exist in Archive Settings the user may add a new one by clicking the + sign.
- Schedule Name. This pick-list is populated from the Schedules control. It determines when archiving under the above parameter will take place. If the schedule desired does not already exist the user may add a new one by clicking the + sign.
- Order: Since a user may add multiple configurations and schedules for archiving the Order value determines which configuration will take precedence if there is overlap in the schedules selected. Primacy of order is taken by the lower value, meaning a value of "1" will override a value of "2" or higher.
- Resolution/Quality: These fields determine what resolution is being pulled from the camera and if using a Video codec (such as h.264) and a model that allows dynamic quality adjustments, then the user may select an definable value ranging from High Quality (0 compression) to Low Quality (100 compression).
Once the parameters are configured a user can ADD that configuration to the Archive Schedules. Multiple Archive Schedules can be configured to accommodate varying requirements for that camera. Finally, the Archive Store information (where the video data will be stored and for how long):
- Archive Store: This pick-list is populated from the Stores component within the Administration Module. If the Store desired does not already exist the user may add a new one by clicking the + sign.
- Target Days: The desired retention period is controlled for the camera by setting a target number of days. If there exists storage space within the defined Archive Store the camera will continue to archive reaching the Target number of days (plus one) before deleting on a First-In-First-Out (FIFO) basis, by day. The extra day buffer is designed so that the target number of days is retained upon deletion of the oldest "expired" archives.
- Cap Target Size (GB): Another mechanism of setting a threshold for retention is upon overall archive size (in Gigabytes) instead of by days. This is an option to control cameras who may take a large amount of storage due to resolution or motion complexity. Archives will be deleted on a First-In-First-Out (FIFO) basis, by day when this size is met even if it occurs prior to the Target Days being met.
- Allow Archives to Exceed Target: If more space exists in the Archive Store assigned to the camera after the retention period is met, this option will allow the archives to continue to accrue until the overall Store space threshold is met regardless of the total number of days archived. The Store threshold is defined within the Stores component itself.
Set Motion Alerts
Motion alerts from a camera are configured to allow a notification upon Motion either in the Side Panel or as part of a Workflow. To note, Motion Alerts do not have a bearing on archiving parameters. Those settings are configured in the Archive Settings.
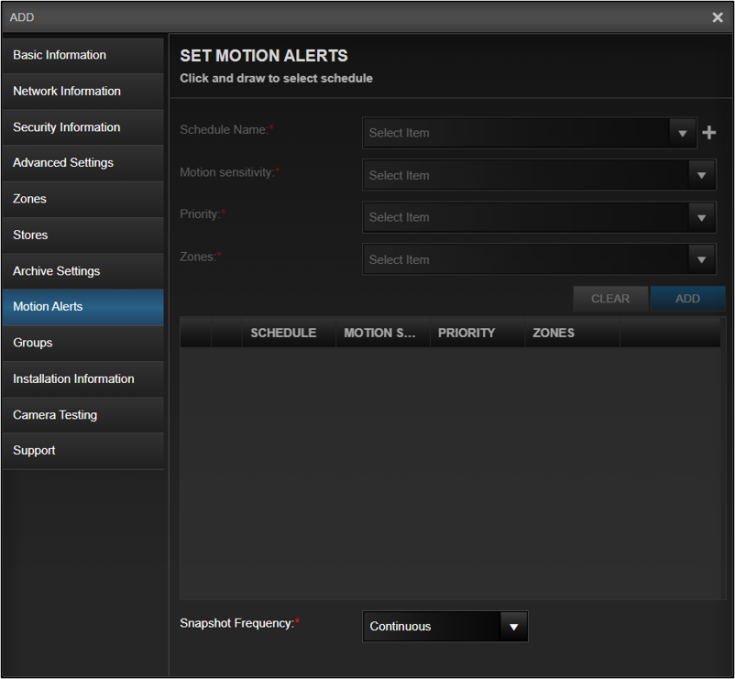
This control allows for setting Motion Alerts by schedule, area, and sensitivity.
- Schedule Name: This pick-list is populated from the Schedules control. It determines when alert notifications will take place. If the schedule desired does not already exist the user may add a new one by clicking the + sign.
- Motion Sensitivity: This default pick-list consists of 5 ranges (High, Medium-High, Medium, Medium-Low, and Low). The thresholds of which are configured by default although they can be adjusted if absolutely necessary, but not recommended, within System Settings.
- Image Area: If the system is archiving and able to gain a snapshot image than the most recent thumbnail image from the camera will be displayed. If not due to communication issues with the camera or while in pre-installation staging than a No Data Available image will be displayed. In either case the user may still draw an area to correspond with the Schedule and Sensitivity chosen above. To finish the design of the area the user may click Add. The user may configure as many areas as desired.
- Snapshot Frequency: Snapshot thumbnail images are retained as a static visual reference within the software for identifying cameras visually in administration or when selecting cameras in various dialog boxes or reports. The Frequency of which are determined as a configurable option.
- "Continuous" will take new snapshots on a defined interval (default is every 20 seconds) within System Settings.
- "Fixed" will take a static snapshot by using the "Capture Image" button that appears when selected. This image will be retained indefinitely or until it is manually changed. Typically cameras that view into rooms or areas that may often have limited light or visibility such as server rooms or IDF are ideal for this function so that the snapshot is taken at an optimal time.
- "Interval" allows the user to select a specific time daily for the snapshot to be taken. This is designed typically for systems where a user wants to capture a thumbnail at a specific time for this reference view.
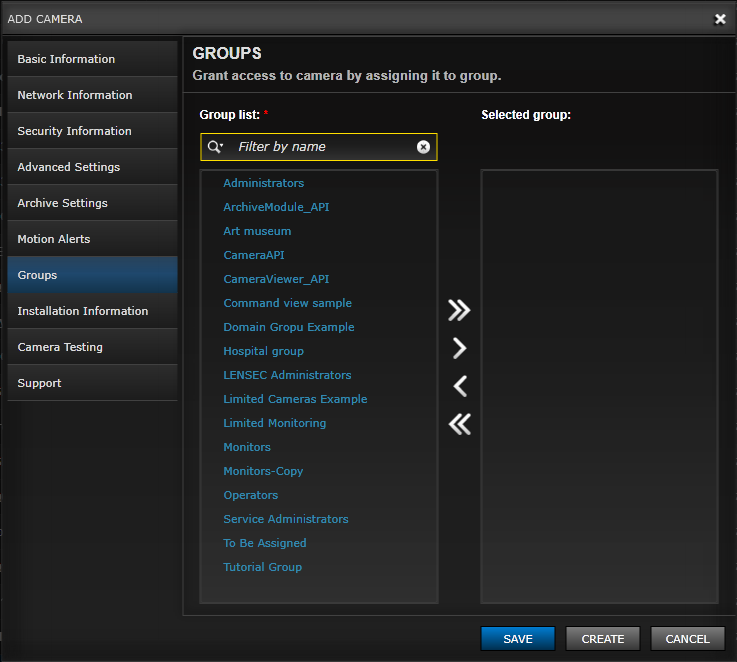
Grant Camera Access to Groups
Assigning permissions to a camera is accomplished by granting access to select permission's Groups.
To assign a group simply move from the group list to the allowed groups and select Save. Groups may be multi-selected and moved. The group list may also be filtered to find the appropriate group for selection.
Set Installation Information
Optional information regarding the camera installation can be added to each camera record. The fields are to provide requisite information for future support and commissioning. These fields include the ability to capture an image to associate the Field of View as well as upload an image from the mounting installation.
_733x664.png)
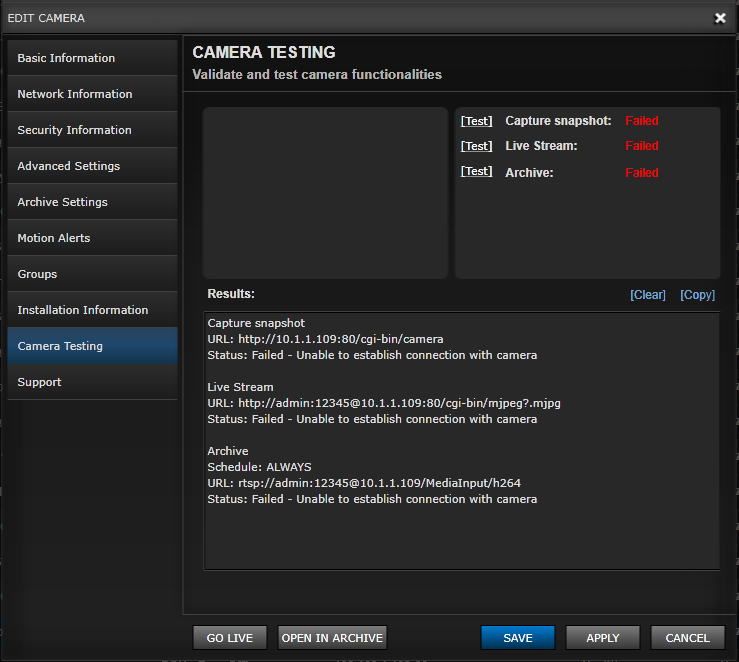
Camera Testing
The Camera Testing tab is an optional interface to test and troubleshoot camera connections. Passing the tests will provide a Success statement and details to the installer or user.
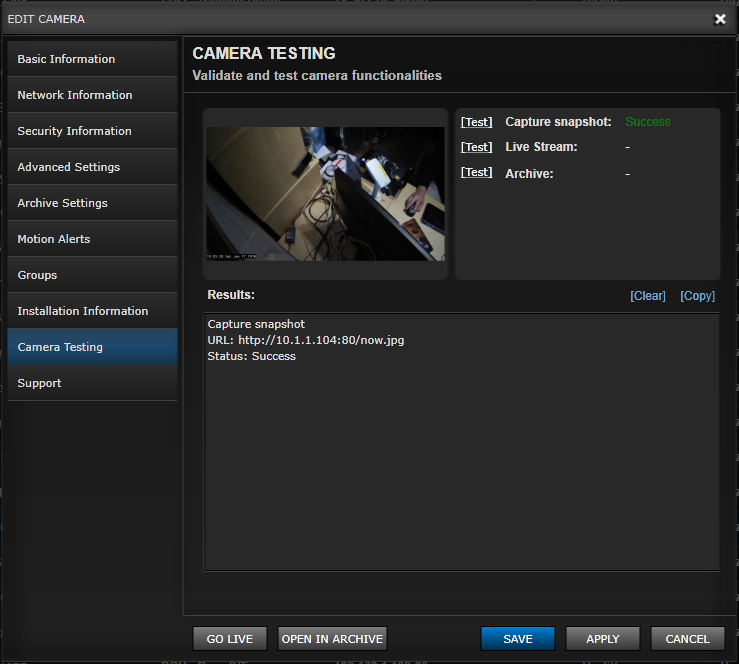
If a connection or configuration fails, the installer will have troubleshooting information such as the connection string to investigate the root cause.
Camera Support Information
The Support Informational tab is an optional entry of support reference information.
The reference information may be added into the Case/Ticket Reference field and assigned a Ticket status (Open, On Hold, Closed). Any Open or On-Hold ticket will be noted as such in the email status reports to prevent technicians from redundant troubleshooting. While this is not a replacement for a Help-Desk or Ticketing system it does provide a location to enter ticket references that can be researched if necessary.
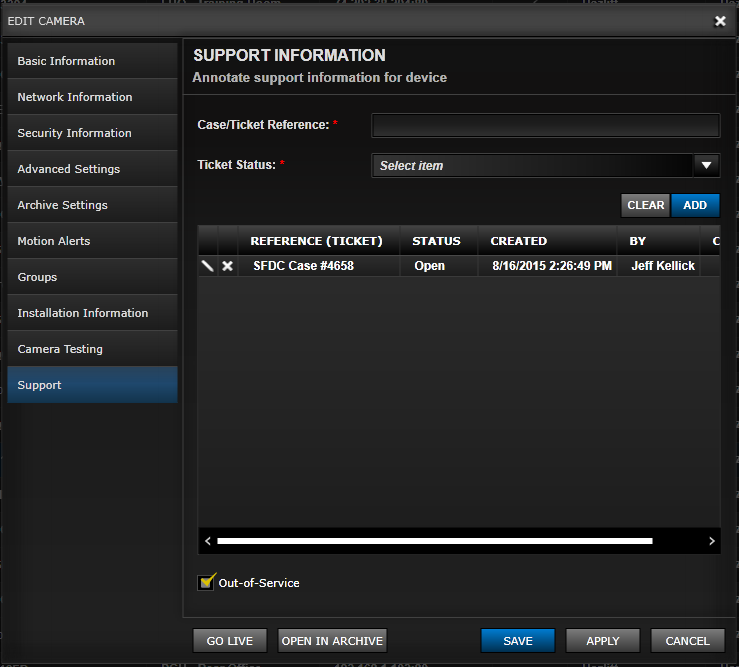
There is also the option of marking a camera Out-of-Service which is a useful indication to users navigating to that camera in live viewing.
Camera Discovery
Automated camera discovery is an option for some camera models. To initiate a find a user can click the "Discover Camera" button on the header of Camera Administration. Found cameras can be imported, if the IP addresses are not already found and assigned.
_1025x89.png)
_610x670.png)
Camera Import Source
As shown in the Import Video action, users can import video from various devices (cell phones, drones, web cameras, internet feeds, etc.). To enable this option an administrator must create an Import Source camera object. This is similar to any other camera except the Model chosen would be "Import Generic Source".
A user or administrator may then use the Camera to define the storage location and other parameters for the import source. This camera object will then e able to be called within the Archive Module along with other system cameras or import sources for a complete forensic view of an event.
_612x628.png)
Next Topic: Camera Models


_168x52.png)

