Camera Models
Camera objects within Perspective VMS are dependent upon the characteristics and attributes defined by the camera model. Different manufacturers and models from supported product companies have varying features and functions. In Perspective VMS we define these abilities through the Camera Model settings within the Administration Module.
Most camera products in use at a site or facility should be supported in the default camera models list and thus are accessible without any editing or additions. However, a unique feature within Perspective VMS is the ability to custom create model parameters without having to wait for a new product release.
Models can be created by Adding New, Copying an existing model and Editing, or by using an Import feature to copy an Export from another installation (or from LENSEC Support).
Set Camera Model Basic Information
When adding or editing a camera model, the initial tab to edit is Basic Information. Basic information will define the root characteristics of the model.
_805x783.png)
Specific fields are defined here below:
- Name: The camera name is what will appear in the pick-list when selecting the model for configuring specific cameras. The name must be unique.
- Manufacturer: Along with sorting the specific models in the pick-list of manufacturers, associating the model with the correct manufacturer also ensures the unique property fields per manufacturer are supported. If the manufacturer for the model is not in the supported list, the user/administrator may use the "Custom" selection from the list.
- Edge Archiving: Another model specific feature that if enabled will pull archives from the cameras own storage card/drive on the "edge" if the connection to the archiving server is disrupted. These settings for edge-archiving must also be carried out on the camera itself and storage must be added to the device.
- Snapshot URL: Images are captured using a specific image snapshot string. If supported by the model than this string will be sent to the camera for the snapshot. If this string is not selected, then the image will be taken from the archiving stream.
- HTTP Stream URL: For cameras that can connect using HTTP (typically for Motion-JPEG streaming)
- RTSP Stream URL: For cameras that can connect using RTSP (typically for H.264/MPEG-4 streaming)
- PTZ Handler: If supported by a specific manufacturer PTZ handler. If not a PTZ (Pan-Tilt-Zoom) leave this as "none". Note PTZ or Advanced PTZ options for the camera configuration are only enabled if a handler is chosen.
- Audio Enabled: For designating that a camera can accept audio input.
- Microphone Enabled: For designating the a camera can accept an audio output.
- Multi-Channel / Sensor: For cameras or encoder models that have multiple channels or sensors.
- I/O Enabled: For camera models that have configurable inputs or outputs.
- Supports SD Cards: To enable edge recording SD cards must be supported by the camera model.
Custom Attributes are fields that are reserved for specific testing and debugging.
Set Camera Model Advanced Information
Advanced information for the Camera Model defines the Direct CGI and Resolution capabilities of that camera model.
_849x809.png)
Specific fields are defined here below:
- Video Direct CGI: To enable direct connection for a camera to a client PC, then enter the syntax for a direct connection. If this is unknown the field can be left with a empty string parameter or forward-slash "/"
- Audio Direct CGI: To enable direct connection for a camera to a client PC, then enter the syntax for a direct connection. If this is unknown the field can be left with a empty string parameter or forward-slash "/"
- Resolution: Resolution settings dictate what resolution values are available for this camera to use. If using Dynamic Resolution than the proper selection of these parameters is very important so that the software knows what values or ranges it can automatically select from.
Set Model PTZ Command Information
If a PTZ Handler was chosen on the Basic Information Tab, then a PTZ Details tab will appear for editing.
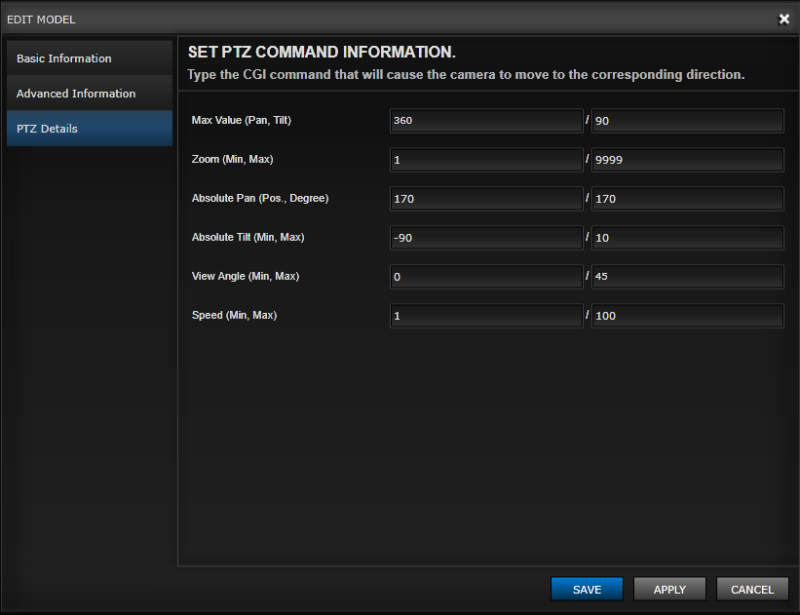
Specific fields are defined here below:
- Max Value (Pan, Tilt): These fields determine the physical range of the camera in degrees for both Pan (left-to-right) and Tilt (up-down)
- Zoom (Min, Max): These fields determine the zoom range (and stepping) of the camera.
- Absolute Pan (Pos, Degree): Some models maintain a stop from full mechanical pan before "flipping" the rotation mechanism. These fields inform the software where that position exists for the camera.
- Absolute Tilt (Min, Max): Some models maintain a stop from full mechanical tilt. These fields inform the software where that position exists for the camera.
- View Angle (Min, Max): This field determines the Field of View Angle for mapping on the PTZ Sphere control.
- Speed (Min, Max): These fields determine the pan/tilt/zoom speed increments when using a relative control or joystick with ability to induce fast or slow panning.
Export/Import Camera Models
Within Perspective VMS, users have the option of creating custom camera models to accommodate models that do not exist in the default listing. Users may then export and or import cameras into other sites or deployments of Perspective VMS. In addition, if requesting a custom model, LENSEC’s support team may provide the configuration parameters as an importable file to ensure the configuration is easy and hassle-free.
*Note all imports and exports must be from within the same version of Perspective VMS.
_983x60.png)
_532x333.png)
To initiate an Export a user will highlight the camera model to be exported and click the Export/Import model, followed by the Export Button. To import a model, clicking on the Export/Import Model and clicking "Load Model" will bring up a dialog box to select and exported models file for importing. This would be followed by checking the models to import and clicking Import.
Import Custom Model Steps:
1. Click on the Administration module.
2. In Administration left panel, navigate to Cameras Camera Models
3. Click the Export/Import button in the table header.
4. Click the Load Model and select the file for import.
5. Once loaded the dialog box will display the model or models available for import.
6. Select your choice(s) and click Import.
Export Custom Model Steps:
1. Highlight the model(s) from the Cameras Model table
2. Click the Export/Import button in the table header
3. Select the model(s) and click Export
Next Topic: Archive Settings


_168x52.png)

