Image Extractions
Located in the Events Panel, the Image Extraction events shows video clips that have been "extracted" or copied from archive storage for longer term retention. Depending on a users' permissions, the user may see only a selected subset of the total image extractions, or none at all.
A user will have two methods to open the events container. A quick view, known as a Pop-Up Preview by clicking on the Image Extraction Button, or the full detailed view known as the Information Panel by expanding the left facing arrow adjacent to the button.
Image Extraction - Pop-Up Preview
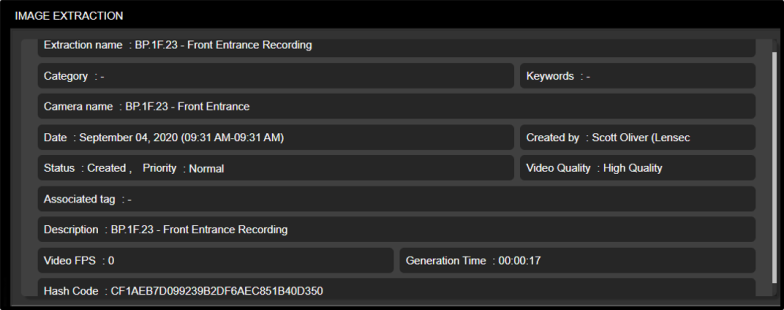
From the Side Panel, the Pop-Up Preview for Extractions can be selected by clicking on the button. The Pop-Up Preview will show selected information and a thumbnail image of the extraction.
_541x331.png)
Characteristics of the Pop-Up Preview
- Click Persistance: When clicking on an extraction it will remain "popped-up" until clicked a second time or until another extraction is clicked.
- Tag Event: Allows the user to "Tag" an extraction thereby associating the archive date/time with a Tag.
- Play Extraction: Playing will open the Information Panel to allow for full playback.
Image Extraction Detail View - Information (Info) Panel
The information panel for Image Extractions provides a detail view of the extraction selected, a player of the extraction (which can be re-sized), and a list view of all viewable extractions for the user.
_1012x551.png)
Image Extraction Details
The Details section of the Image Extraction list the Extraction Name and Camera along with relevant tagged categories or keywords, the date and created author as well as a status to show the queue or created status and priority.
Navigation Bar
The Navigation Bar allows users to focus on the selected Extraction from the list and perform an action.
_819x34.png)
The action definitions are listed here below:
- View In Archives: If the original archives are still stored in the system a user can navigate to that camera and point in time to view the original archive footage.
- Associate Tag / Edit Tag Info: If a tag exists a user may edit the tag info, otherwise they may associate a tag to the extraction.
- Delete: A user/administrator must have full control permissions for extractions to delete an extraction.
- Download: Download allows users to download a copy of the extraction to their local machine. This feature is only allowed by users who have the download extractions permission enabled. All downloads actions are reported in the Audit Reports.
- Edit Tag Info: Edit allows the user to edit the tag information.
- Edit Extraction: Edit allows the user to change the description, priority (if still queued) and collection information.
- Trim Extraction: Trimming is a feature that allows users to refine the extraction by making a copy of an existing extraction to a set time parameter within the existing values. In other words, copying and then trimming the resulting file by time.
- Previous/Next: Allows the user to cycle through extractions
- Print: Allows the user to print the list information below in a report.
Image Extraction List
The Image Extraction List allows users to search, filter, and sort on all accessible Image Extractions. Additional filter options are available by selecting the filter icon located on the navigation bar. Users can sort on the additional column headers.
_783x279.png)
*Note that the Image List/Detail sections can be re-sized by using the Handle in the middle navigation bar. Users can also use the side scroll bar to scroll through the list view. Here below is the same image as above with the List View expanded.
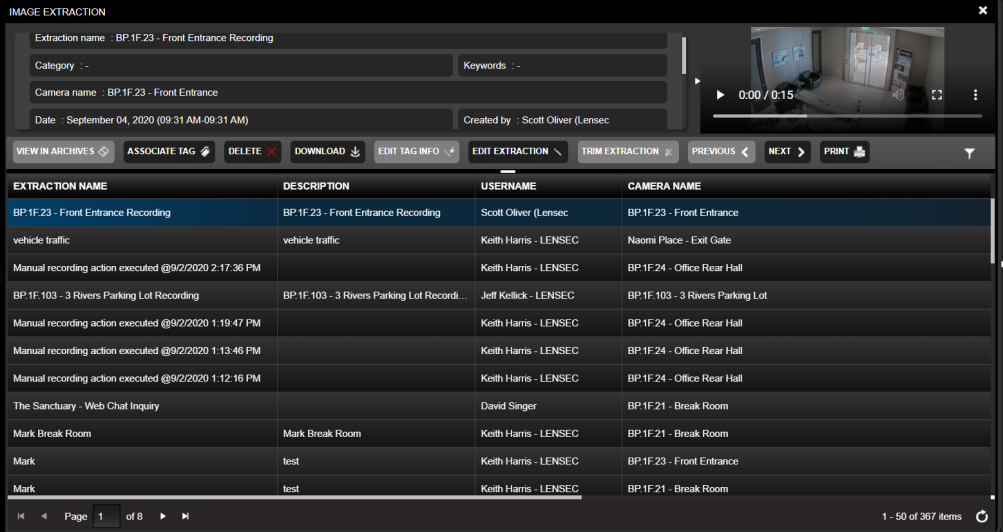
Image Extraction - Download
Downloading an extraction will copy the extraction to the local user's PC. As noted it can be initiated from the Image Extraction Navigation Bar. Upon selecting Download, the user will be able to confirm the file choice and download location. The system will confirm when the download completes.
_858x445.png)
*Note if a user needs to expose the embedded date/time stamp from the archiving server, there is a Sub Track written on each Extraction which can be exposed in a VLC Player by right-clicking in the video, navigating to Subtitle -> Sub Track -> Date/Time Stamp
Next Topic: Administration Module


_168x52.png)

